

Your cart is currently empty!
Electric welding & electrofusion of pipes
PRINCIPLE OF ELECTROFUSION WELDING
Download the full manual under files
All electrofusion fittings have a metal resistance wire embedded in the fitting. When the wire is connected to a power source, the wire heats up and melts nearby PE material, which expands and creates a contact pressure between the pipe and the fitting.
For a good weld joint strength:
– Dirt and oxide layer removed
– Welding surfaces dry
– Tolerance requirements for pipes and fittings fulfilled
– Welding and cooling time respected
– Fitting fixed to the pipe during the whole welding and cooling time
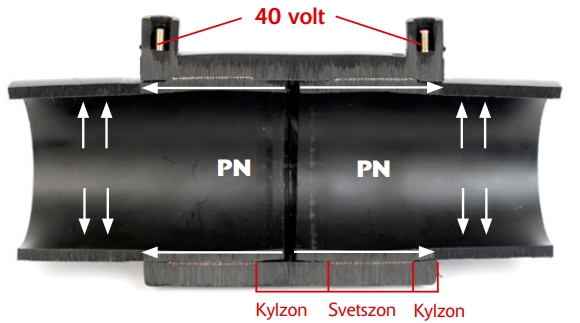
An electrofusion coupler must be able to absorb both radial forces of water pressure and axial forces, see figure.
In principle, the welded joint must be able to absorb axial tensile forces as large as the PE pipe itself. To achieve a weld joint with good strength properties, the tolerances between pipe and socket must be small and the weld surfaces clean, and the pipe must be scraped.
It is the heat emitted by the metal wire that first melts the PE material on the inside of the socket and then the material on the outside of the pipe end.
The molten PE material expands slightly and a small amount of molten material is pressed out towards the cooling zones where it solidifies. The solidified PE material encloses the weld area and further heat release from the metal wire provides additional molten material which expands and will build up a melt pressure within the weld zone.
The melt pressure reaches its optimum value at the end of the welding period. An indication that sufficient welding pressure has been built up can be obtained by pressing molten PE material out through indicator holes on the electrofusion coupler.
With electrofusion it is possible to join pipes with different SDR classes. Check that the electrofusion pipe
parts fit the relevant SDR classes of the pipes.
ELECTROFUSION FITTINGS AND WELDING EQUIPMENT
There are many different brands of electrofusion fittings.
Usually the fittings are made of PE 100 material and can be used for both PE 80 and PE 100 pipes.
Please also note that there are different types of welding machines. Choose the welding machine that is suitable for the welding fittings in question.
When electrofusion saddle welding on a PE pipe, the saddle must be clamped to the pipe to allow the welding pressure to build up. This can be achieved by using a saddle with an upper and lower part clamped over the pipe or by fixing the saddle with a holding tool.
MARKING AND SCRAPING
Pipes and fittings to be welded must be dry and clean. Wipe off any loose dirt from the pipe ends with dry lint-free paper. Mark the area to be scraped.
Check that the fitting has the correct marking to fit the pipes to be welded. Scrape the pipe ends carefully to remove oxide layers on the pipe. Use rotary scrapers if possible. The scraped area should be at least 10 mm longer than half the length of the welding socket.
Never use abrasive paper, files or grinders to remove oxide layers on the pipe.
Check that the whole area has been properly scraped. Avoid touching scraped surfaces and the inside of the sleeve. Open the weld joint packaging only when the joint is to be fitted and check that the joint is clean inside. Fit the joint to the scraped pipe end without undue delay.
CLEANING
It is best to electrofusion weld without using wet wiping. This can be done if the pipes are freshly scraped, the electrofusion pipe section has just been removed from its bag and the welding is done at once. When electrofusion welding large pipes, scraping may take so long that it is necessary to wet-dry the welding surfaces.
If the scraped surfaces of the pipes or the inside of the joint are accidentally touched or soiled, the surfaces should be wet-dried with isopropanol and lint-free paper or special wipes. Note that it takes longer for the liquid to evaporate in cold weather.
Wet wiped surfaces must be visibly dry (NOTE, do not touch the surfaces) before joining and welding the parts.
LABELING AND ASSEMBLY
Electrofusion joints should always be kept sealed in their packaging until welding work begins.
Measure the entire length of the joint without opening the packaging bag and mark half the length of the joint on the pipe.It is important that the scraped surfaces are kept clean and dry and that welding takes place as soon as possible after scraping.
Open and remove the packaging bag and immediately fit the sleeve to the pipe.
Check that the pipe reaches the bottom of the sleeve.
Then fit the fixing tool.
Do not start the welding process if it cannot be completed in one go
WELDING
Make sure that the pipe and fitting are correctly aligned in the fixing tool to avoid tension between pipe and socket. Connect the electrofusion coupler to the welding machine.
Follow the welding machine instructions for setting the welding time. The welding time is set by barcode, automatically or manually. Large electrofusion joints sometimes have two barcodes. The first preheats the joint and the pipe to reduce the gap between pipe and joint and thus facilitate the build-up of welding pressure.
When the preheating is complete, the second code is read in and welding starts. The pipe and fitting must not be disturbed during the entire welding and cooling period and must therefore be clamped in the fixing tool.
Monitor the welding process throughout the welding time and do not touch the pop-up indicators on the sleeve during welding
COOLING
After welding, the cables can be removed. However, the pipe and sleeve must remain clamped in the fixing tool throughout the cooling period. The cooling time is specified by the fitting manufacturer.
After the cooling time has elapsed, remove the fixing tool and inspect the weld. Check that the weld indicators have appeared and that no threads or melts are visible in the socket ends. If any of the above are not met, contact the electrode manufacturer for possible action.
The weld is marked with the date, welder’s signature and time when the cooling time is completed.
QUALITY ASSURANCE OF WELDING WORK
A reliable check of the weld quality can only be made with so-called destructive testing, which means that the pipe section is cut away from the line and tested to failure.
Large electrofusion fittings are expensive and are therefore not usually tested. For more extensive electrofusion work, it is recommended that procedural testing be carried out, i.e. that destructive testing be performed on some fittings before the work is started. Defects in electrofusion welding are usually due to poor workmanship. Cleanliness and accuracy in the execution of the welding work is very important.
As a routine check of the completed electrofusion welding, it should be checked that the welding indicators have appeared and that no wires or melts are visible outside the socket ends.
In addition, it should be checked that the pipe is scraped (preferably with a rotating scraping tool) and that the insertion mark on the pipe shows that the pipe is inserted far enough into the socket and that the pipe has not slipped during heating.
0 €
PRINCIPLE OF ELECTROFUSION WELDING
Download the full manual under files
All electrofusion fittings have a metal resistance wire embedded in the fitting. When the wire is connected to a power source, the wire heats up and melts nearby PE material, which expands and creates a contact pressure between the pipe and the fitting.
For a good weld joint strength:
– Dirt and oxide layer removed
– Welding surfaces dry
– Tolerance requirements for pipes and fittings fulfilled
– Welding and cooling time respected
– Fitting fixed to the pipe during the whole welding and cooling time
An electrofusion coupler must be able to absorb both radial forces of water pressure and axial forces, see figure.
In principle, the welded joint must be able to absorb axial tensile forces as large as the PE pipe itself. To achieve a weld joint with good strength properties, the tolerances between pipe and socket must be small and the weld surfaces clean, and the pipe must be scraped.
It is the heat emitted by the metal wire that first melts the PE material on the inside of the socket and then the material on the outside of the pipe end.
The molten PE material expands slightly and a small amount of molten material is pressed out towards the cooling zones where it solidifies. The solidified PE material encloses the weld area and further heat release from the metal wire provides additional molten material which expands and will build up a melt pressure within the weld zone.
The melt pressure reaches its optimum value at the end of the welding period. An indication that sufficient welding pressure has been built up can be obtained by pressing molten PE material out through indicator holes on the electrofusion coupler.
With electrofusion it is possible to join pipes with different SDR classes. Check that the electrofusion pipe
parts fit the relevant SDR classes of the pipes.
ELECTROFUSION FITTINGS AND WELDING EQUIPMENT
There are many different brands of electrofusion fittings.
Usually the fittings are made of PE 100 material and can be used for both PE 80 and PE 100 pipes.
Please also note that there are different types of welding machines. Choose the welding machine that is suitable for the welding fittings in question.
When electrofusion saddle welding on a PE pipe, the saddle must be clamped to the pipe to allow the welding pressure to build up. This can be achieved by using a saddle with an upper and lower part clamped over the pipe or by fixing the saddle with a holding tool.
MARKING AND SCRAPING
Pipes and fittings to be welded must be dry and clean. Wipe off any loose dirt from the pipe ends with dry lint-free paper. Mark the area to be scraped.
Check that the fitting has the correct marking to fit the pipes to be welded. Scrape the pipe ends carefully to remove oxide layers on the pipe. Use rotary scrapers if possible. The scraped area should be at least 10 mm longer than half the length of the welding socket.
Never use abrasive paper, files or grinders to remove oxide layers on the pipe.
Check that the whole area has been properly scraped. Avoid touching scraped surfaces and the inside of the sleeve. Open the weld joint packaging only when the joint is to be fitted and check that the joint is clean inside. Fit the joint to the scraped pipe end without undue delay.
CLEANING
It is best to electrofusion weld without using wet wiping. This can be done if the pipes are freshly scraped, the electrofusion pipe section has just been removed from its bag and the welding is done at once. When electrofusion welding large pipes, scraping may take so long that it is necessary to wet-dry the welding surfaces.
If the scraped surfaces of the pipes or the inside of the joint are accidentally touched or soiled, the surfaces should be wet-dried with isopropanol and lint-free paper or special wipes. Note that it takes longer for the liquid to evaporate in cold weather.
Wet wiped surfaces must be visibly dry (NOTE, do not touch the surfaces) before joining and welding the parts.
LABELING AND ASSEMBLY
Electrofusion joints should always be kept sealed in their packaging until welding work begins.
Measure the entire length of the joint without opening the packaging bag and mark half the length of the joint on the pipe.It is important that the scraped surfaces are kept clean and dry and that welding takes place as soon as possible after scraping.
Open and remove the packaging bag and immediately fit the sleeve to the pipe.
Check that the pipe reaches the bottom of the sleeve.
Then fit the fixing tool.
Do not start the welding process if it cannot be completed in one go
WELDING
Make sure that the pipe and fitting are correctly aligned in the fixing tool to avoid tension between pipe and socket. Connect the electrofusion coupler to the welding machine.
Follow the welding machine instructions for setting the welding time. The welding time is set by barcode, automatically or manually. Large electrofusion joints sometimes have two barcodes. The first preheats the joint and the pipe to reduce the gap between pipe and joint and thus facilitate the build-up of welding pressure.
When the preheating is complete, the second code is read in and welding starts. The pipe and fitting must not be disturbed during the entire welding and cooling period and must therefore be clamped in the fixing tool.
Monitor the welding process throughout the welding time and do not touch the pop-up indicators on the sleeve during welding
COOLING
After welding, the cables can be removed. However, the pipe and sleeve must remain clamped in the fixing tool throughout the cooling period. The cooling time is specified by the fitting manufacturer.
After the cooling time has elapsed, remove the fixing tool and inspect the weld. Check that the weld indicators have appeared and that no threads or melts are visible in the socket ends. If any of the above are not met, contact the electrode manufacturer for possible action.
The weld is marked with the date, welder’s signature and time when the cooling time is completed.
QUALITY ASSURANCE OF WELDING WORK
A reliable check of the weld quality can only be made with so-called destructive testing, which means that the pipe section is cut away from the line and tested to failure.
Large electrofusion fittings are expensive and are therefore not usually tested. For more extensive electrofusion work, it is recommended that procedural testing be carried out, i.e. that destructive testing be performed on some fittings before the work is started. Defects in electrofusion welding are usually due to poor workmanship. Cleanliness and accuracy in the execution of the welding work is very important.
As a routine check of the completed electrofusion welding, it should be checked that the welding indicators have appeared and that no wires or melts are visible outside the socket ends.
In addition, it should be checked that the pipe is scraped (preferably with a rotating scraping tool) and that the insertion mark on the pipe shows that the pipe is inserted far enough into the socket and that the pipe has not slipped during heating.
Product details
Article number:
No files available.
PRINCIPLE OF ELECTROFUSION WELDING
Download the full manual under files
All electrofusion fittings have a metal resistance wire embedded in the fitting. When the wire is connected to a power source, the wire heats up and melts nearby PE material, which expands and creates a contact pressure between the pipe and the fitting.
For a good weld joint strength:
– Dirt and oxide layer removed
– Welding surfaces dry
– Tolerance requirements for pipes and fittings fulfilled
– Welding and cooling time respected
– Fitting fixed to the pipe during the whole welding and cooling time
An electrofusion coupler must be able to absorb both radial forces of water pressure and axial forces, see figure.
In principle, the welded joint must be able to absorb axial tensile forces as large as the PE pipe itself. To achieve a weld joint with good strength properties, the tolerances between pipe and socket must be small and the weld surfaces clean, and the pipe must be scraped.
It is the heat emitted by the metal wire that first melts the PE material on the inside of the socket and then the material on the outside of the pipe end.
The molten PE material expands slightly and a small amount of molten material is pressed out towards the cooling zones where it solidifies. The solidified PE material encloses the weld area and further heat release from the metal wire provides additional molten material which expands and will build up a melt pressure within the weld zone.
The melt pressure reaches its optimum value at the end of the welding period. An indication that sufficient welding pressure has been built up can be obtained by pressing molten PE material out through indicator holes on the electrofusion coupler.
With electrofusion it is possible to join pipes with different SDR classes. Check that the electrofusion pipe
parts fit the relevant SDR classes of the pipes.
ELECTROFUSION FITTINGS AND WELDING EQUIPMENT
There are many different brands of electrofusion fittings.
Usually the fittings are made of PE 100 material and can be used for both PE 80 and PE 100 pipes.
Please also note that there are different types of welding machines. Choose the welding machine that is suitable for the welding fittings in question.
When electrofusion saddle welding on a PE pipe, the saddle must be clamped to the pipe to allow the welding pressure to build up. This can be achieved by using a saddle with an upper and lower part clamped over the pipe or by fixing the saddle with a holding tool.
MARKING AND SCRAPING
Pipes and fittings to be welded must be dry and clean. Wipe off any loose dirt from the pipe ends with dry lint-free paper. Mark the area to be scraped.
Check that the fitting has the correct marking to fit the pipes to be welded. Scrape the pipe ends carefully to remove oxide layers on the pipe. Use rotary scrapers if possible. The scraped area should be at least 10 mm longer than half the length of the welding socket.
Never use abrasive paper, files or grinders to remove oxide layers on the pipe.
Check that the whole area has been properly scraped. Avoid touching scraped surfaces and the inside of the sleeve. Open the weld joint packaging only when the joint is to be fitted and check that the joint is clean inside. Fit the joint to the scraped pipe end without undue delay.
CLEANING
It is best to electrofusion weld without using wet wiping. This can be done if the pipes are freshly scraped, the electrofusion pipe section has just been removed from its bag and the welding is done at once. When electrofusion welding large pipes, scraping may take so long that it is necessary to wet-dry the welding surfaces.
If the scraped surfaces of the pipes or the inside of the joint are accidentally touched or soiled, the surfaces should be wet-dried with isopropanol and lint-free paper or special wipes. Note that it takes longer for the liquid to evaporate in cold weather.
Wet wiped surfaces must be visibly dry (NOTE, do not touch the surfaces) before joining and welding the parts.
LABELING AND ASSEMBLY
Electrofusion joints should always be kept sealed in their packaging until welding work begins.
Measure the entire length of the joint without opening the packaging bag and mark half the length of the joint on the pipe.It is important that the scraped surfaces are kept clean and dry and that welding takes place as soon as possible after scraping.
Open and remove the packaging bag and immediately fit the sleeve to the pipe.
Check that the pipe reaches the bottom of the sleeve.
Then fit the fixing tool.
Do not start the welding process if it cannot be completed in one go
WELDING
Make sure that the pipe and fitting are correctly aligned in the fixing tool to avoid tension between pipe and socket. Connect the electrofusion coupler to the welding machine.
Follow the welding machine instructions for setting the welding time. The welding time is set by barcode, automatically or manually. Large electrofusion joints sometimes have two barcodes. The first preheats the joint and the pipe to reduce the gap between pipe and joint and thus facilitate the build-up of welding pressure.
When the preheating is complete, the second code is read in and welding starts. The pipe and fitting must not be disturbed during the entire welding and cooling period and must therefore be clamped in the fixing tool.
Monitor the welding process throughout the welding time and do not touch the pop-up indicators on the sleeve during welding
COOLING
After welding, the cables can be removed. However, the pipe and sleeve must remain clamped in the fixing tool throughout the cooling period. The cooling time is specified by the fitting manufacturer.
After the cooling time has elapsed, remove the fixing tool and inspect the weld. Check that the weld indicators have appeared and that no threads or melts are visible in the socket ends. If any of the above are not met, contact the electrode manufacturer for possible action.
The weld is marked with the date, welder’s signature and time when the cooling time is completed.
QUALITY ASSURANCE OF WELDING WORK
A reliable check of the weld quality can only be made with so-called destructive testing, which means that the pipe section is cut away from the line and tested to failure.
Large electrofusion fittings are expensive and are therefore not usually tested. For more extensive electrofusion work, it is recommended that procedural testing be carried out, i.e. that destructive testing be performed on some fittings before the work is started. Defects in electrofusion welding are usually due to poor workmanship. Cleanliness and accuracy in the execution of the welding work is very important.
As a routine check of the completed electrofusion welding, it should be checked that the welding indicators have appeared and that no wires or melts are visible outside the socket ends.
In addition, it should be checked that the pipe is scraped (preferably with a rotating scraping tool) and that the insertion mark on the pipe shows that the pipe is inserted far enough into the socket and that the pipe has not slipped during heating.
Article number:
No files available.