


Your cart is currently empty!
All about how to install indoor plumbing
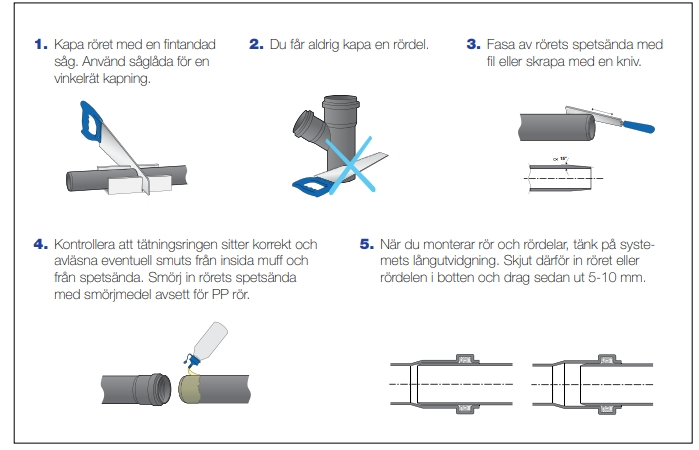
Cut and assemble fittings as follows

- Cut the pipe perpendicularly with a fine-toothed saw.
- You must never cut a pipe part such as a bend.
- Chamfer the tip end of the tube with a file or scrape with a knife.
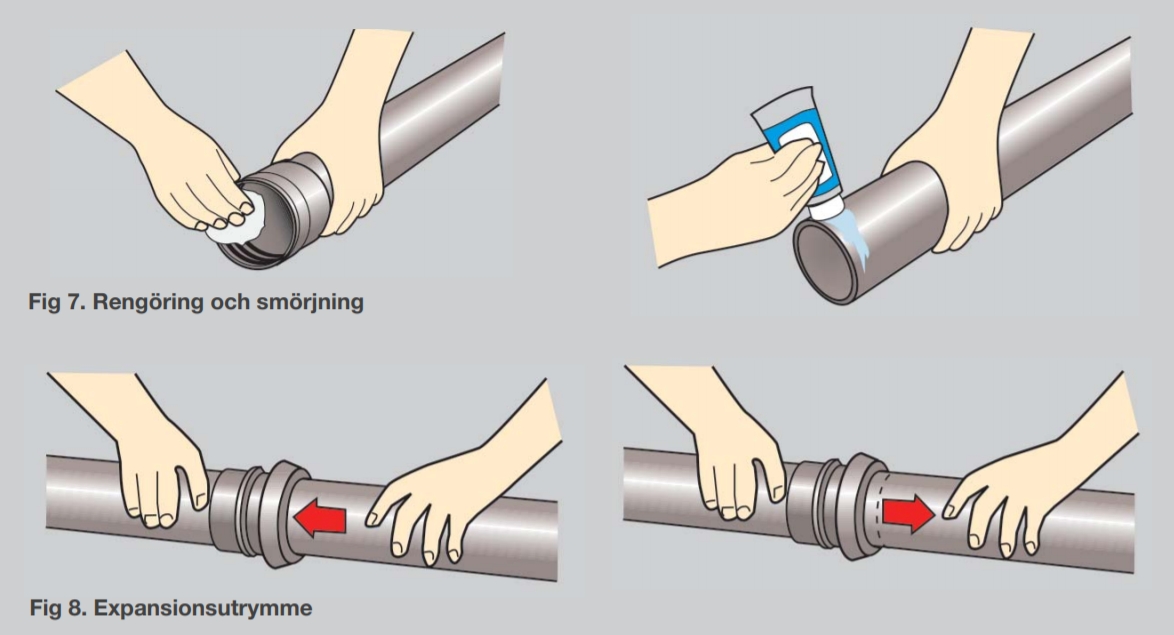
- Check that the sealing ring is correctly fitted and remove any dirt from the inside of the sleeve and from the tip end. Lubricate the tip end of the pipe with lubricant intended for PP pipes.
- When installing pipes and fittings, keep in mind the length expansion of the system. Therefore, push the pipe or fitting into the bottom and then pull out 5-10 mm
Sizing of indoor drains
- Venting 75-110 mm
- Washbasin 50 mm
- Floor drain 75 mm
- Kitchen drain 75 mm
- WC 110 mm
Fixing sewer pipes
All sewer pipes, both vertical and horizontal, must be fitted with pipe supports such as
clamps or similar. The pipe supports are used both to fix the pipe to the building and to control the expansion of the pipe into a so-called expansion pipe. The pipe supports protect the various building components from possible damage while ensuring the system’s functionality over time.
Suspension of horizontal pipes requires a short distance between supports (as a water-filled pipe can bend downwards if the distance between supports is too long). Remember that sliding joints should always be mounted so that they cannot slide in any direction.
When plugging drains, use a plug that is mounted in the joint. Install the plug so that it cannot be pushed out in the event of a blockage in the drain.
Clamping distances (according to AMA)
Dimension Horizontal wire Vertical wire
50 mm 0.50 m 1.0 m
75 mm 0.8 m 1.3 m
110 mm 1.1 m 1.5 m
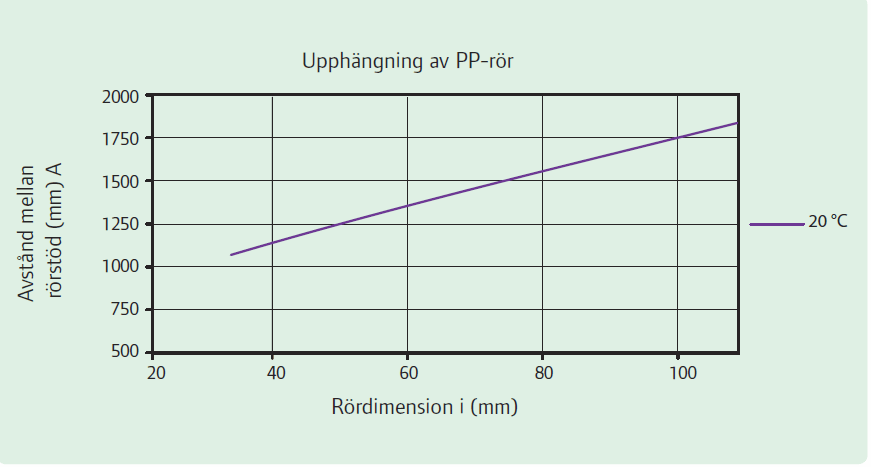
Length expansion
When hot water flows through the pipes, the system piping expands. The amount of longitudinal expansion depends on the length of the pipe, the coefficient of linear expansion and the temperature difference between the pipe and the water. For the system to cope with the expansion, it is important
that the pipes are positioned so that there is sufficient room for length expansion. An effective way to solve this
Joints
Indoor sewerage systems can be joined using jointing sleeves. In this type of jointing, the expansion of the pipe length must be taken into account. By means of rubber-ring-jointed and expansion-absorbing joints, the longitudinal expansion of the pipe is neutralized.
Expansion formula
In residential and similar buildings where the pipe length rarely exceeds 4 meters and where the temperature difference is usually less than 20 degrees Celsius, length expansion does not need to be taken into account. For other types of installations, you can calculate the length expansion using the formula below.
Length expansion = L x T x 0.15
L = Length of pipe in meters
Delta T = Temperature difference between pipe and water
0.15 = Length expansion coefficient mm/m°C
Temperature
Wastewater pipes should not be laid directly from e.g. cooking pots or where the temperature can exceed 60°C for a long time, however, laying at a short-term temperature of 100°C at q< 30 l/min. for 2 min.
Pipes can be used at a PH value between 2-12.
What slope should the pipes have for self-fall?
Horizontal pipes shall be installed with the following minimum self-fall:
- Dim 110, 9 per thousand (9 mm/m)
- Dim 75, 14 per thousand (14 mm/m)
- Dim 50, 20 per thousand (20 mm/m)
How to install and connect sewer pipes?
- Horizontal and vertical cables are connected by means of branch pipes at a maximum angle of 90 degrees.
- Upright and horizontal busbars are connected using branch pipes at a maximum angle of 45 degrees.
- Standing and horizontal wires are connected using two bends at a maximum angle of 45 degrees (per bend).
- Overhead lines are connected to each other by means of branch pipes at a maximum angle of 45 degrees.
- For the waste water pipe under the toilet seat, the installation depth must be at least 60 mm.
Flushing device
Use flushing pipes with a 90-degree connection to the flushing device on horizontal manifolds under the base plate and in the ground. On vertical wastewater pipes, the cleaning device should be installed with the lower edge 400 mm above the floor. Make sure that the service opening of the cleaning device is large enough for optimal cleaning and easy inspection.
How to install wastewater pipes to the toilet?
When installing wastewater units such as washbasins and toilet seats, the distance between the wall’s waterproofing and the wastewater pipe must be at least 60 mm and the distance between the upper edge of the wastewater pipe and the finished floor must be at least 40 mm.
To prevent movement between the pipe and the waterproofing, it is important that the wastewater pipe is securely fixed at the pipe penetration. The drain pipe is installed first and must be adapted for sealing against the waterproofing.
The wastewater pipe or connection socket must be adapted for a sealing collar or seal for liquid waterproofing. The connection socket must be heat-resistant and designed so that the floor mat can be folded over it for a minimum of 15 mm.
Penetrations in waterproofing
As mentioned above, the wastewater pipe or connection socket should be installed before the waterproofing. It is also important that the wastewater pipe/plug is fixed so that no movement can occur between the pipe/plug, wall and waterproofing. For optimum fixing, use perforated bands or brackets and rubber spacers
About the installation of indoor wastewater systems
Pipe and fittings are available in dimensions 32 in white and gray color and 50, 75 and 110 mm in gr...
Installation instructions for indoor sewer pipes
Installation instructions for indoor sewer pipes.
Download the guide or read parts of the guide her...
All about how to install indoor plumbing
Cut and fit fittings as follows
Cut the pipe at right angles with a fine-toothed saw.
Never cut a fi...